Finally! The OS itself has simple features to completely disable the microphone and the cameras, independently of each other. No more black electrical tape on camera lenses! No more accidental dialing a random number and not knowing that you and your surroundings are being overheard!
Android’s camera apps usually capture an unwanted “preview” image from your default lens ANY time they are the foreground app, EVEN if you have no intention of taking a picture! Though it doesn’t automatically save it to a file, that preview image will persist in memory and is retrievable until you force-close the app.
These excellent extra-layer-of-privacy features are a little buried by default so you have to go looking for them, but they’re easy to use after a very simple change.
Re-enabling mic or camera is fast, easy, and seamless
These are implemented well. If you launch any app (such as “Camera”) that tries to activate any camera device while they are disabled, you’ll get an authorization popup [see examples below]. It’s easy to hit Cancel or Unblock as you choose. ALSO, when it’s enabled and ACTIVE in an app, a small green indicator will now show in your notifications bar — much like the LED on many computers by the webcam lens. Great!
Similarly, if you try to make a phone call or use another microphone-dependent app while that is disabled, an authorization will ask for permission to Unblock the microphone.
How to remember and quickly disable them afterward
The screenshots here show how I’ve configured my phone’s Quick Settings Tiles. This way, whenever you’re finished making a call or taking your photos, with a swipe and a tap, you can reset the privacy-enforcing mode. If you don’t put these Quick Settings where you’ll frequently see them, then you’re likely to leave them ON all the time, losing this benefit.
Rearranging your Quick Settings “Tiles” is easy. Just swipe down from the top of the screen, and you’ll see the top four tiles above any notifications. Swipe down once more and you’ll probably see more Quick Settings Tiles, plus a few small icons. Tap the little pencil icon to edit the arrangement of tiles.
You’ll probably have to scroll down quite a bit to find the “Mic access” and “Camera access” tiles. By default they’re in the inactive list. So one at a time, you tap-and-hold the tile you want, then drag it up to the top section. That makes it active. You can do the same tap-hold-drag to place it in the sequence where you want it.
If you care about using these settings, put them somewhere in the top 4 or at least top 8 tiles. In normal use, you can see and change the top 4 tiles with only one swipe. The 5th-8th tiles take two swipes to see.
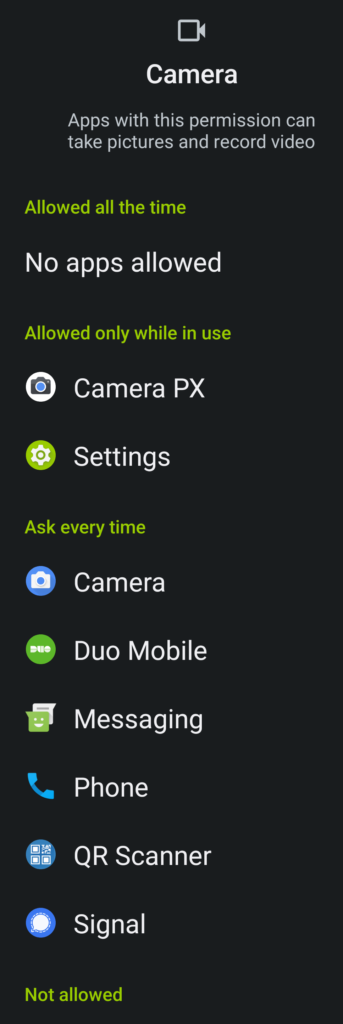
Remember to also check and adjust every app’s permissions!
This could be a big article of its own. But to be brief here, you should look to see all apps which have permission to your cameras or microphones, for example. And revoke those permissions for any app that you don’t need and want it to have. A LOT of Android apps and the scummy companies behind them try to get access to things they have no legitimate reason to know about you.
The ability to control this sort of permission broadly has been around for years, starting with Android 6. But the user’s ability to search for and change those permissions has become gradually easier to use. With Android 11, we also gained the ability to grant temporary permissions of certain types. These are all great improvements, but you have to take just a little effort to gain the maximum control.
Develop a habit, so that EVERY time you decide to install an app, you carefully review its permissions and deny all you can before you even launch it.
A later article will discuss how to review the privacy and security concerns of an app BEFORE you even install it, so you can be even more informed and selective.